So, you’ve seen all those stunning ‘cut crease’ eye makeup looks on social media and you can’t help but be intrigued. But the question is, how do you actually nail this trendy eye makeup technique? Well, look no further because in this article, we’ll break down the steps to achieving the perfect ‘cut crease’ look. From selecting the right eyeshadow shades to mastering the art of precise blending, we’ve got you covered. Get ready to take your eye game to the next level and wow everyone with your flawless ‘cut crease’ eye makeup skills.
Check here to see how this cup of morning coffee will bright your whole day!!
Choosing the Right Products
When it comes to achieving the perfect ‘cut crease’ eye makeup look, choosing the right products is crucial. Here are some key products you’ll need to create this trendy style:
Eyeshadow Primer
The first step in creating a flawless ‘cut crease’ is to apply a reliable eyeshadow primer to your lids. This step is essential for ensuring that your eyeshadow stays in place all day and prevents any creasing or fading. Look for a primer that is specifically designed for the eyelids and has a long-lasting formula.
Concealer or Base
To create a sharp and defined cut crease, it’s important to have a smooth canvas to work on. Use a concealer or a light-colored base to neutralize any discoloration on your eyelids and create an even base for the eyeshadow. This step will also help to intensify the colors you use on your lids later on.
Eyeshadow Palette
An eyeshadow palette with a variety of shades is essential for creating the perfect ‘cut crease’ look. Look for a palette that offers a range of matte and shimmer shades, as well as a good mix of light and dark colors. Having a versatile palette will allow you to play around with different combinations and create endless eye-catching looks.
Eyeliner
Eyeliner plays a crucial role in defining the cut crease and adding depth to your eye makeup. Opt for a creamy and pigmented eyeliner pencil or a liquid eyeliner for more precise lines. Whether you prefer a classic black liner or want to experiment with other colors, make sure to choose one that suits your style and complements the rest of your makeup.
Eyebrow Products
While not directly related to the cut crease technique, well-defined eyebrows can enhance the overall look and balance your eye makeup. Depending on your preference, you can use eyebrow pencils, pomades, powders, or gels to fill in any sparse areas and shape your brows. Make sure to choose a shade that matches your natural hair color for the most natural-looking results.
Prepping Your Eyes
Before diving into creating the cut crease itself, it’s crucial to properly prep your eyes for the makeup application. This will ensure that your eye makeup goes on smoothly and lasts throughout the day.
Clean and Moisturize
Start by cleansing your face and gently removing any makeup residue from your eyes. This step will create a clean canvas for your eye makeup and prevent any product buildup. After cleansing, use a lightweight eye cream to moisturize the delicate skin around your eyes. This will help to prevent any dryness and keep your skin hydrated.
Apply Eyeshadow Primer
Applying eyeshadow primer is a game-changer when it comes to achieving long-lasting and vibrant eye makeup. Use your fingertips or a small brush to apply a thin layer of primer all over your eyelids, blending it in seamlessly. Allow the primer to set for a minute or two before moving on to the next step.
Conceal and Set
To create a blank canvas for your eyeshadow and ensure that the colors pop, use a concealer or a light-colored base to cover any discoloration or veins on your lids. Apply the concealer with a small brush or your fingertips and blend it outwards, reaching the brow bone. Set the concealer with a matte translucent powder to prevent creasing and smudging.
Define Your Eyebrows
Take a moment to fill in your eyebrows using your preferred eyebrow product. Start by lightly filling in any sparse areas and then define the shape by outlining and filling in the rest of your brows. Brush through your eyebrows with a spoolie brush to blend the product and achieve a natural look.
Creating the Cut Crease
The cut crease is the focal point of this trendy eye makeup look. Follow these steps to achieve a perfectly defined and sharp cut crease:
Mapping Out the Crease
Using a light eyeshadow shade or a pencil, map out the shape of your cut crease on your eyelid. This will serve as a guide and ensure precision when applying the eyeshadows later on. Start by drawing a line above your natural crease, extending it outwards towards the outer corner of your eye. Remember to keep the line as thin or as thick as you desire, depending on the intensity you want to achieve.
Applying Transition Shade
To create depth and dimension in your cut crease, apply a transition shade in the crease area. This shade should be slightly darker than your skin tone and can be a matte or lightly shimmered color. Use a blending brush to gently blend the transition shade back and forth in your crease, making sure to blend out any harsh lines.
Cutting the Crease with Concealer
Now comes the crucial step of cutting the crease. Take a small, flat brush and dip it into a creamy concealer. Carefully trace along the line you previously mapped out on your eyelid, creating a smooth, clean line. Make sure to smoothly connect the end of the line with the outer corner of your eye for a seamless finish.
Setting the Concealer
To prevent any creasing or smudging, set the concealer with a translucent powder or a skin-toned eyeshadow. Use a small and fluffy brush to gently press the powder or eyeshadow on top of the concealer, ensuring that it stays in place throughout the day. This step will also help to create a smooth base for the following eyeshadow shades.
Defining the Crease with Eyeshadow
Complete the cut crease look by applying eyeshadow to define the crease further. Choose a darker shade than your transition shade and use a small, precise brush to carefully apply it right into the cut crease area. Blend the color gently to create a seamless transition between shades and achieve a gradient effect. Continue building up the color until you reach the desired intensity.
Adding Dimension and Depth
To add depth and dimension to your ‘cut crease’ look, follow these steps:
Deepening the Outer Corner
To create a more dramatic and defined look, deepen the outer corner of your eyes with a darker eyeshadow shade. Using a small, pointed brush, apply the eyeshadow to the outer corner and blend it into the crease. This step will add dimension and create a beautiful gradient effect.
Defining the Lower Lash Line
To balance the intensity of the upper lid, define your lower lash line with a matching or slightly darker eyeshadow shade. Use a small, angled brush to carefully apply the eyeshadow along the lower lash line, starting from the outer corner and working towards the inner corner. This will tie your eye makeup together and create a cohesive look.
Blending Everything Together
To ensure a seamless and polished finish, blend all the eyeshadows together using a clean blending brush. Move the brush back and forth in windshield wiper motions to soften any harsh lines and create a smooth transition between colors. Pay extra attention to the crease area and the outer edges of your eye makeup for a flawless result.
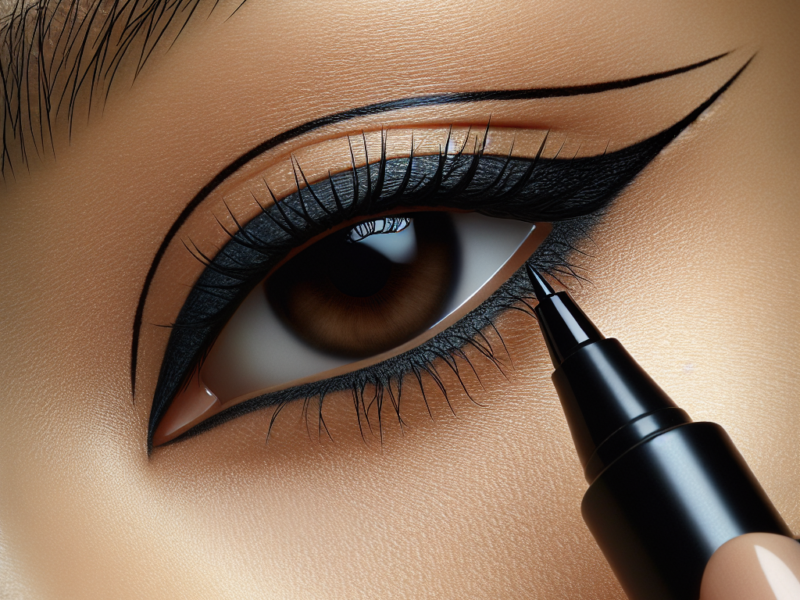
Applying Eyeliner and Mascara
Now it’s time to enhance your eyes even further with eyeliner and mascara:
Choosing the Right Eyeliner
When it comes to choosing the right eyeliner for your ‘cut crease’ look, you have a variety of options. Whether you prefer a bold winged liner or a softer smudged effect, make sure to choose an eyeliner formula that is long-lasting, pigmented, and easy to work with. Gel eyeliners and liquid eyeliners are popular choices for creating precise lines.
Creating a Winged Liner
A winged liner can add extra drama and definition to your ‘cut crease’ eye makeup look. Start by drawing a thin line along your lash line, gradually thickening it towards the outer corner of your eye. Then, create a flick upwards at the end of the line to create the wing. Make sure both wings are symmetrical by using small strokes and taking your time. For a more subtle look, you can skip the wing and just line your upper lash line.
Applying Mascara
Finish off your eye makeup by applying mascara to your curled lashes. Curl your lashes with an eyelash curler first, then carefully apply mascara from the roots to the tips in a zigzag motion. This will help to evenly distribute the product and give your lashes volume and length. For an extra touch, you can apply a second coat of mascara or even use false lashes for added drama.
Adding Finishing Touches
To complete your ‘cut crease’ eye makeup look, consider these finishing touches:
Highlighting the Inner Corner
To make your eyes pop and add a touch of brightness, apply a shimmery or light-colored eyeshadow to the inner corners of your eyes. This will help to open up your eyes and make them appear more awake and vibrant. Use a small brush or your fingertip to apply the highlighter, gently blending it into the surrounding eyeshadow.
Applying False Lashes (optional)
If you want to take your ‘cut crease’ look to the next level, consider applying false lashes. False lashes can add volume, length, and drama to your eyes, creating a show-stopping effect. Choose lashes that suit the shape and size of your eyes and follow the instructions for application carefully. Don’t forget to use lash glue that is specifically designed for false lashes and allow it to dry for a few seconds before applying the lashes.
Adding Eye Makeup Details
To add extra flair and personalization to your eye makeup, consider adding small details such as glitter, rhinestones, or colored eyeliner. These details can elevate your look and make it truly unique. Apply the glitter or rhinestones using a small brush and a dab of lash glue, and add a thin line of colored eyeliner along your upper or lower lash line for a fun and dynamic effect.

Fixing Mistakes
Even the most experienced makeup enthusiasts make mistakes from time to time. Here’s how to fix common errors when creating a ‘cut crease’ eye makeup look:
Cleaning Up Fallout
If you experience fallout from your eyeshadow or loose glitter, don’t panic. To clean up the fallout, simply take a clean makeup brush or a cotton swab and gently sweep away any excess product. You can also use a small amount of makeup remover on a cotton pad to remove any stubborn fallout, making sure not to smudge or ruin the rest of your makeup.
Correcting Uneven Liner
If your eyeliner doesn’t turn out as symmetrical as you’d like, there’s an easy fix. Dip a cotton swab into a little bit of makeup remover and carefully erase the uneven parts. Then, use a clean brush or a cotton swab to reapply the eyeliner, making sure to take your time and create beautiful symmetrical lines.
Fixing Uneven Eyeshadow
If your eyeshadow shades aren’t blending seamlessly or one eye looks different from the other, don’t worry. Take a clean blending brush and gently blend the colors together, using small circular motions. This will help to soften any harsh lines and create a more cohesive and balanced look. Take your time and go back and forth between each eye until you achieve the desired result.
Additional Tips and Tricks
To further enhance your ‘cut crease’ eye makeup and make the process smoother, consider these additional tips and tricks:
Choosing the Right Brushes
Investing in high-quality brushes specifically designed for eye makeup application can make a world of difference. Look for brushes with soft and densely packed bristles that are suitable for blending, packing on color, and creating precise lines. Having the right tools will not only make your makeup application more enjoyable but also ensure a professional-looking end result.
Investing in Quality Products
While makeup can be a fun and creative form of self-expression, investing in quality products is essential for achieving a flawless ‘cut crease’ eye makeup look. Look for eyeshadows, eyeliners, and primers from reputable brands that have good reviews and are known for their longevity and pigmentation. Quality products will not only make your makeup look better but also last longer throughout the day.
Experimenting with Different Colors
Don’t be afraid to step out of your comfort zone and experiment with different eyeshadow colors and finishes. The ‘cut crease’ technique can be adapted to any color palette, allowing you to create unique and eye-catching looks. Play around with bold shades, metallic finishes, or even gradient color combinations to truly make a statement. Remember, makeup is all about having fun and expressing your personality.
Practicing and Patience
Like any skill, mastering the ‘cut crease’ eye makeup technique takes practice and patience. Don’t worry if your first attempts don’t turn out exactly as you envisioned. Keep practicing, experimenting with different techniques and shades, and most importantly, have patience. With time and practice, you’ll become more confident and adept at creating stunning ‘cut crease’ eye makeup looks.
In conclusion, nailing the trendy ‘cut crease’ eye makeup requires the right products, proper eye preparation, careful technique, and attention to detail. By following the steps outlined above, experimenting with different colors and finishes, and practicing with patience, you’ll be able to create stunning ‘cut crease’ eye makeup looks that will turn heads and make a lasting impression. So go ahead, unleash your creativity, and have fun exploring the world of ‘cut crease’ eye makeup!